
The 8D acronym stands for 8 Disciplines. The main aim of this method is to systematize the eradication of problems in a factory. The 8D methodology is one of the most comprehensive and widely-used resources as it structures problem-solving in a variety of scenarios. Read on to find out more about the 8D method.
Definition of the 8D method
Based on the PDCA (Plan, Do, Check, Act) or “Deming wheel” principle, the 8D method was widely used by Ford in the late 80s as a means of standardization, with a collaborative approach to problem management.
The 8D method is a comprehensive approach whose aim is to solve issues by helping decision-making. By providing a standard framework, the methodology helps formalize processes for managing unexpected problems. The 8D method ensures that the company drills down to the underlying causes in order to guarantee that they are permanently removed.
In practical terms: a designated shop floor team goes through a thorough 8-step sequence to examine every aspect of a problem that has arisen in the factory. Let’s take a rejected part as an example. The 8D method is part of a continuous improvement process. The aim is to find solutions that are as relevant as they are sustainable over time, in order to understand how this part became a reject, why it happened and how to avoid it recurring.
To achieve this, the dedicated team draws on the experience of those concerned by the problem. Its effectiveness lies in its collaborative nature, as well as a cross-disciplinary, multi-disciplinary approach.
Finally, the 8D method is designed to be effective for a wide range of problem types: product, quality, organization, inter-process, inter-departmental, customer/supplier relations, etc.
And here’s an interesting detail: for a number of years now, certain people have been adding a 9th step to the 8D method. This is 0D, or the importance of planning the action right at the start of the process.
The different steps in the 8D methodology
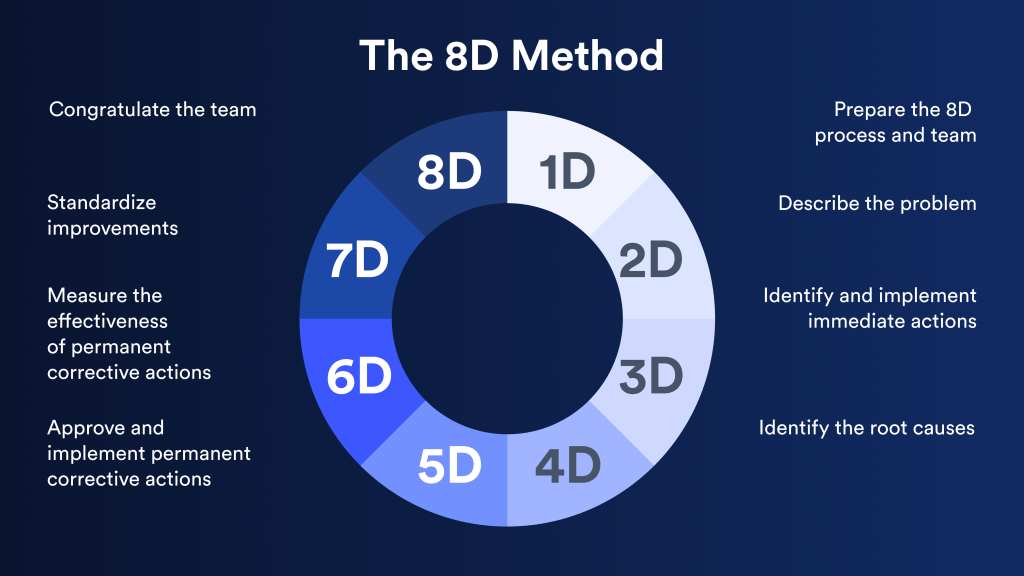
1D – Preparing the 8D process
The aim of this first step is to put together a competent team, with the time and authority to solve the problem. The team will need to:
> Appoint a facilitator and a rapporteur
> Clarify each member’s responsibilities
> Clarify shared and individual objectives
> Present the methodology
2D – Describing the problem
> Define the problem
To define the problem in question, we generally use the 5W2H tool : What? Who? Where? When? How? How much/many? Why?
Let’s take the example of a manufacturing error in a part to better understand the type of questions that can be asked at this stage of the process:
- What are the consequences of the error?
- Who raised the issue and who is affected ?
- Where the issue appeared ?
- When ?
- How ?
- Why ?
- How many products / services are affected by this manufacturing defect?
> Identify challenges
> Identify constraints
3D – Identifying and implementing immediate actions
> Identify immediate “curative actions” that can quickly alleviate the problem. These “sticking plaster actions” are not sustainable solutions.
> Implement “curative actions”, also known as “immediate actions”.
> Measure action plan effectiveness
At this point, the team typically tries to gain a better understanding of the problem as a whole.
4D – Identifying the root causes
Using brainstorming with methods such as the” 5 Whys” or Ishikawa diagrams, the designated team analyzes the root causes of the problem encountered.
The 5 Why method, invented by Toyota’s founding fathers, is an iterative questioning system consisting quite simply of asking the question “Why?” five times, digging a little deeper each time into the causes of the problem. If the problem is very complex, we can, of course, ask “Why?” more than five times!
Once the root causes have been identified, the team will strive to:
> Check each of them through different tests, witness accounts and the whole gamut of available data.
> Define alternative corrective actions to the immediate actions in order to permanently eliminate the causes.
5D – Approving and implementing permanent corrective actions
Through this step, the dedicated team will aim to:
> Confirm the identified corrective actions are appropriate and effective in relation to the problem, through tests.
> Determine solution approval criteria (costs, resources, feasibility, etc.)
> Organize the tasks for each member of the team to implement the solution(s).
> Schedule action roll-out.
> Organize monitoring of action roll-out.
6D – Measuring the effectiveness of permanent corrective actions
Use a variety of protocols, tests, experiments and checks to assess results of actions taken. If the results are not satisfactory, the 8D team must reconvene to analyze the reasons for failure and undertake new actions.
7D – Standardizing improvements
To prevent a recurrence of the problem(s) addressed by the 8D method, it is necessary to standardize the improvement actions that were implemented.
> Establish the likelihood of the problem recurring in the future
> Define preventive checks
> Update internal documentation (procedures, instructions, operating modes, organization charts, etc.)
8D – Congratulate the team
When we succeed in finding and implementing solutions to a problem, it’s important to recognize a job well done.
> Congratulate team members on their involvement and efforts
> Recognize the time and energy spent on solving the problem
> List the lessons to be learned from the project in terms of positive and negative points encountered
> Communicate internally, in a broad and inclusive way, to encourage use of the method and motivate staff.
Did you know? Fabriq can help you use the 8D method to tackle one of your organization’s problems! By opening a “ticket” or a “problem” in your Fabriq environment, you’ll access an online 8D methodology that will help you find effective solutions!